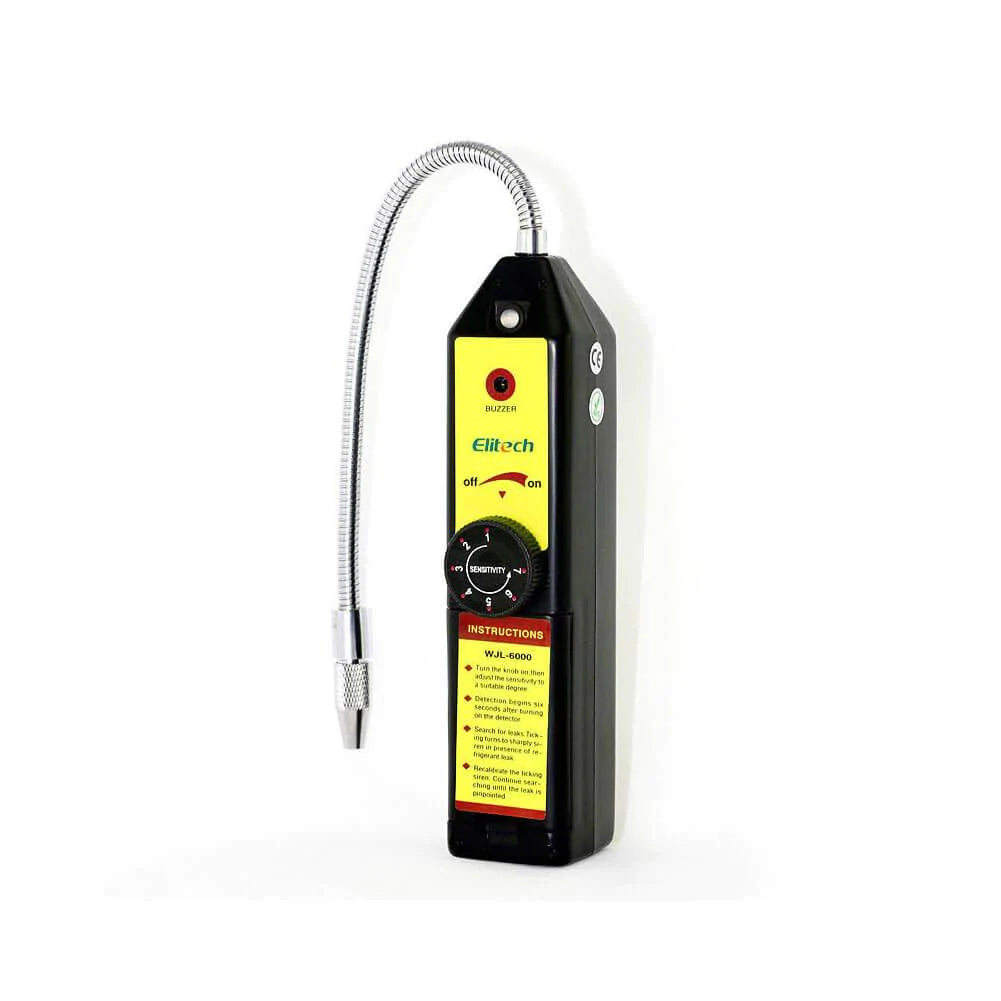
Elitech User Manual | WJL-6000 Leak Detector
General Information
Incorporated with advanced leak detect technology, WJL-6000 is a product with the functions of easy operation, stable function and small appearance. It's an ideal and economic halogen leak detector.
Features
- Detect all kinds of halogen refrigerants.
Sensitivity adjusted at any time and it can be adjusted automatically to the best state of detecting. Designed with precise IC with Ultra-Low consume circuit design, more stable, longer battery time.
- Dual-color visual display of battery voltage.
- Excellent sensor, high sensitivity, longer use time.
Battery Voltage Indication
The forepart light of panel indicates the leak and the battery voltage. Green-Battery voltage is normal, sufficient for proper operation. Red-Battery voltage is approaching the lower threshold for operation, replace as soon as possible.
Reset Feature/Automatic Circuit
WJL-6000 features on automatic circuit and a reset function that set the unit to ignore ambient concentrations of Halogen. Reset: Upon initial power on, the unit automatically sets itself to ignore the level of refrigerant present at the tip in 6's and enter into the best state of detection. If place the sensing tip near a known leak and switch the unit on, it's convenient to find higher concentration leak. Or move to fresh air and switch on the device, adjust to maximum sensitivity, any concentration above zero will be detected. Automatic circuit: When it is in the measuring state, the circuit will follow the changing concentration of halogen gas in environment to avoid false alarm.
Adjustment of sensitivity
The unit features sensitivity adjustment. Turn the button clockwise to adjust to high sensitivity; counterclockwise to lower sensitivity. It does not mean, the higher sensitivity, the better the unit will work, because if the air is not fresh, by selecting higher sensitivity will cause an false alarm.
Leak alarm
When the leaked gas is detected, the detector will beep quicker. The more refrigerant gas was detected, the higher the beep frequency will be. The light indicator will flash quickly at the same time.
Operating Instructions
Switch on the unit, the buzzer will beep constantly. Check the battery voltage level by observing the power indicator. Adjust appropriate sensitivity or adjust the sensitivity at any time during operation. This adjustment will not interrupt detection. Wait for 6s to warm up after the unit is switched on. When a leak refrigerant is detected, the buzzer will beep in a higher frequency. Verify the potential leak place and detect continuously until the leak is confirmed.
Operating tips
Adjust to the higher sensitivity, when a leak can't be found. Adjust to the lower sensitivity when unstable. When the buzzer alarms for leak and if the sensing tip remained at the place being detected long enough, the circuit will equalize it. In windy areas, even a large leak is difficult to be found. In this condition, it is better to shield the potential leak area. Be aware that the detector may alarm if the sensing tip contacts with moisture and/or solvents. Therefore, avoid contact with these when leak checking.
Recommended Procedure
A Note
On Automotive A/C Systems leak test with the engine not in operation. The air conditioning or refrigeration system should be charged with sufficient refrigerant to have a gauge, pressure of at least 340 kpa (50 psi) when not in operation. At temperatures below 15°C(59T), leaks may not be measurable, since this pressure may not be reached.
Please do not contaminate the sensor tip. If the part is particularly dirty, or condensate(moisture) is present, it should be wiped off with a dry shop towel or blown off with shop air. No cleaners or solvents should be used, the detector may be sensitive to their ingredients. Visually trace the entire refrigerant system, and look for signs of air conditioning lubricant leakage, damage, and corrosion on all lines. Hose, and components. Each of the suspected area should be carefully checked with the detector probe, as well as all fittings, hose to line couplings, refrigerant controls, service ports with caps in place, brazed or welded areas, and areas around attachment points and hold-downs on lines and components. Always follow the refrigerant system around in a continuous path so that no areas of potential leaks are missed. If a leak is found, always continue to test the remainder of the system. At each area checked, the probe should be moved around the location, at a rate no more than 25 to 50 mm/second(1-2in/second). And no more than 5mm(1/4in) from the surface, completely around the position.
Slower and closer movement of the probe greatly improves the likelihood of finding a leak. An apparent leak shall be verified at least once as follows: a) Blow shop air into the area of the suspected leak, if necessary, and repeat the check of the area. In case of very large leaks, blowing out the area with shop air often helps locate the exact position of the leak. b)First move the probe to fresh air and reset. Then hold the probe tip as close as possible to the indicated leak source and slowly move around it until the leak is confirmed.
Automotive A/C Systems only
Leak testing of the evaporator core while in the air conditioning module shall be accomplished by turning the air conditioning blower on high for a period of 15 seconds minimum, shutting it off, then wait for the refrigerant to accumulate in the case of 10 minutes. After that, insert the leak detector probe into the blower resistor block or condensate drain hole, if no water is present, or into the closet opening in the heating/ventilation/air conditioning case to the evaporator, such as the heater duct or vent duct. If the detector alarms, a leak apparently has been found.
All Systems
Following any service to the refrigerant systems and any other service which disturbs the refrigerant system, a leak test of the repair and of the service ports of the refrigerant system should be done.
Applications
The WJL-6000 may also be used to: Detect leaks in other systems and storage/recovery containers. It will respond to All halogenated (contains Chlorine and Fluorine) refrigerants. This includes, but is not limited to: CFCS e.g., R12, R11, R500, R503 etc... HCFCS e.g.R22, R123, R124, R502 etc... HFCS e.g., R134a, R404a, R125 etc... Blends such as AZ-50. HP62. MP39 etc... Detect Ethylene Oxide gas leaks in hospital sterilizing equipment (it will detect the halogenated carrier gas).
- Detect SF-6 in high voltage circuit breakers. Detect most gases that contain chlorine, Fluorine and Bromine (halogen gases). Detect cleaning agents used in dry cleaning applications such as perchloroethylene. Detects halogen gases in fire-extinguishing system.
Maintenance
Appropriate maintenance of your leak detector is very important. Carefully follow the instructions to reduce the mal-operation and prolong the service life of the unit. Keep the sensing tip clean from the dust, moisture and grease. If the tip is dirty, it can be cleaned by immersing in a mild solvent, such as alcohol, for several seconds, and then use compressed air and/or a towel to clean. Never use solvents such as gasoline, turpentine, minerals etc. for they will leave detectable residue and desensitize the unit.
A Wamina
Turn the detector off before replacing the sensing tip. Failure to do so may result in a mild electric shock!
Sensing tip replacement: the tip will eventually wear out and require replacement. It is difficult to predict exactly when should the sensor tip be replaced as it is related to the condition and frequency of use. The tip should the sensor tip be replaced as it is related to the condition and frequency of use.
Take out the batteries in case the detector is left unused for a long time. If the tool does not work, please inspect if the batteries are well contacted or the voltage is below acceptable operating level. If not, please inspect if the tip is dirty and not well contacted with the probe. Your part of opening the tool is beyond the warranty service.

Comments
Leave a comment